


Crafting a modded Sculpt OS image in a few moderate steps
I'd like to invite you to get playful with Sculpt OS. Because Sculpt OS is entirely Free Software, no user is bound to the decisions taken by us core developers. This article gives you tangible steps to start modding your user experience beyond the mere configuration level.
Sculpt OS is extremely flexible but the user experience of the administrative user interface is for the most part an expression of one particular taste. This taste is of course not shared by everyone. In this article, I'm going to guide you through the steps of modifying (any aspect of) Sculpt OS to your preferences by going down to the source-code level.
We will start with playful customizations of the look and feel by tweaking the inner guts of the widget renderer while getting familiar with quick iterative testing directly on GNU/Linux. I'll then take you through running Sculpt OS on Linux, making the jump from Linux to a microkernel on bare-bones PC hardware, and finally applying the very same modifications to the mobile version of Sculpt OS on the PinePhone. What a ride! Better fasten you seatbelts.
Preparation
This guide assumes that you using GNU/Linux (e.g., Debian) as development environment.
-
Install the Genode tool chain:
-
Clone Genode's Git repository:
$ git clone https://github.com/genodelabs/genode.git
$ cd genode
genode$ git checkout -b sculpt-23.10 sculpt-23.10
-
Download the components for building and testing Sculpt on a GNU/Linux PC:
 genode$ ./tool/depot/download \
         genodelabs/bin/x86_64/base-linux/2023-10-24 \
         genodelabs/pkg/x86_64/drivers_interactive-linux/2023-10-24 \
         genodelabs/pkg/x86_64/sculpt/2023-10-25 \
         genodelabs/pkg/x86_64/fonts_fs/2023-10-24 \
         genodelabs/bin/x86_64/dynamic_rom/2023-10-24
This command downloads pre-built packages along with the source code. The content is downloaded to the public/ directory and extracted to the depot/ directory.
-
Create and configure a build directory for the 64-bit x86 architecture
genode$ ./tool/create_builddir x86_64
Configure the build directory by editing the build/x86_64/etc/build.conf file. Enable the gems, libports, ports, pc, dde_linux, dde_rump, and dde_bsd repositories by uncommenting the corresponding lines.
Enable parallel builds by uncomment the following line:
MAKE += -j4
Rolling up the sleeves
For a start, the most intriguing and fun vector of customization would certainly be the look and feel. The style of Sculpt's administrative user interface is pretty much dictated by the widget-rendering component called menu view. So lets dive right into modifying this particular part of the system.
It's best to start with test-driving the menu-view component in isolation, outside the Sculpt system.
genode$ make -C build/x86_64 run/menu_view KERNEL=linux BOARD=linux
Upon the first try, this command leaves you with a message like this:
 make: Entering directory '/tmp/genode/build/x86_64'
 including /tmp/genode/tool/run/power_on/linux
 including /tmp/genode/tool/run/log/linux
 including /tmp/genode/tool/run/boot_dir/linux
 including /tmp/genode/repos/gems/run/menu_view.run
 building targets:  app/menu_view
 spawn make app/menu_view
 make[1]: Entering directory '/tmp/genode/build/x86_64'
 checking library dependencies...

 Error: Ports not prepared or outdated:
   libc libpng zlib

 You can prepare respectively update them as follows:
   ./tool/ports/prepare_port libc libpng zlib
After following this advice, the next try of the command builds the system scenario repos/gems/run/menu_view.run and starts it directly on your Linux system.
|
The menu_view.run script provides you with a nice testing ground for modifying the widget-rendering component. To customize the run script to your liking, it is useful to know that one dynamic_rom component switches out the menu_view dialog in intervals while another instance (fonts_fs_config_rom) adjusts the font sizes dynamically. During iterative development and testing, it is certainly useful to reduce the dynamics by making the dynamic-rom configurations less wild. Speaking of development, here are a few ideas to tinker with:
-
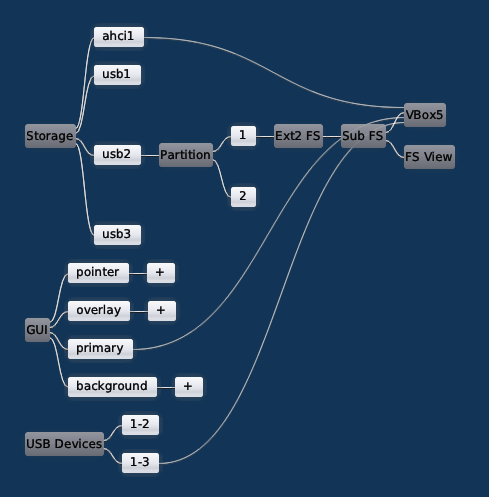
Tweaking the button parameters a bit. On the PinePhone (see below), it is better to increase the height (to make buttons easier to touch) and slightly decrease the width (because horizontal space is scarce). To achieve this, one can adjust the _padding values at repos/gems/src/app/menu_view/button_widget.h like this:
Padding _padding { 8, 8, 4, 3 };The make run/menu_view command (see above) allows you observe the effects of such a change in almost no time.

On the left, you see the original. On the right, the tweaked version. Note the changed aspect ratio of the + button.
-
One can remove geometry animations by changing the motion_steps value in repos/gems/src/app/menu_view/widget.h to 1. This makes the GUI feel crisper and more responsive on the cost of loosing orientation whenever things move on screens.
static Animated_rect::Steps motion_steps() { return { 1 }; };You may also like tweaking the blending-animation steps of button-state changes (like hovering) by modifying the SLOW, MEDIUM, and FAST values in repos/gems/src/app/menu_view/button_widget.h to 1.
-
The default colors of Sculpt OS are rather cold. To give the colors a more earthly tone, one can tweak the underlying PNG files using ImageMagic, e.g.,
 genode$ find repos/gems/src/app/menu_view/styles -name "*.png" |\
         xargs -ixxx convert -gamma 2.5 -fill gold -tint 95 \
                             -modulate 100,30 xxx png32:xxx
Note the png32: format specifier, which is needed because menu_view expects an alpha channel in each PNG image.
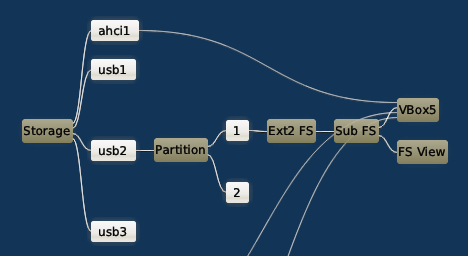
I'm sure you can do better. ;-)
Test-driving the changes by running Sculpt on Linux
Once satisfied with the tweaks, let us see how they would look in Sculpt OS. For this, we can give Sculpt OS a try on Linux directly!
 genode$ make -C build/x86_64 run/sculpt_test \
              KERNEL=linux BOARD=linux DEPOT=omit LOG=core
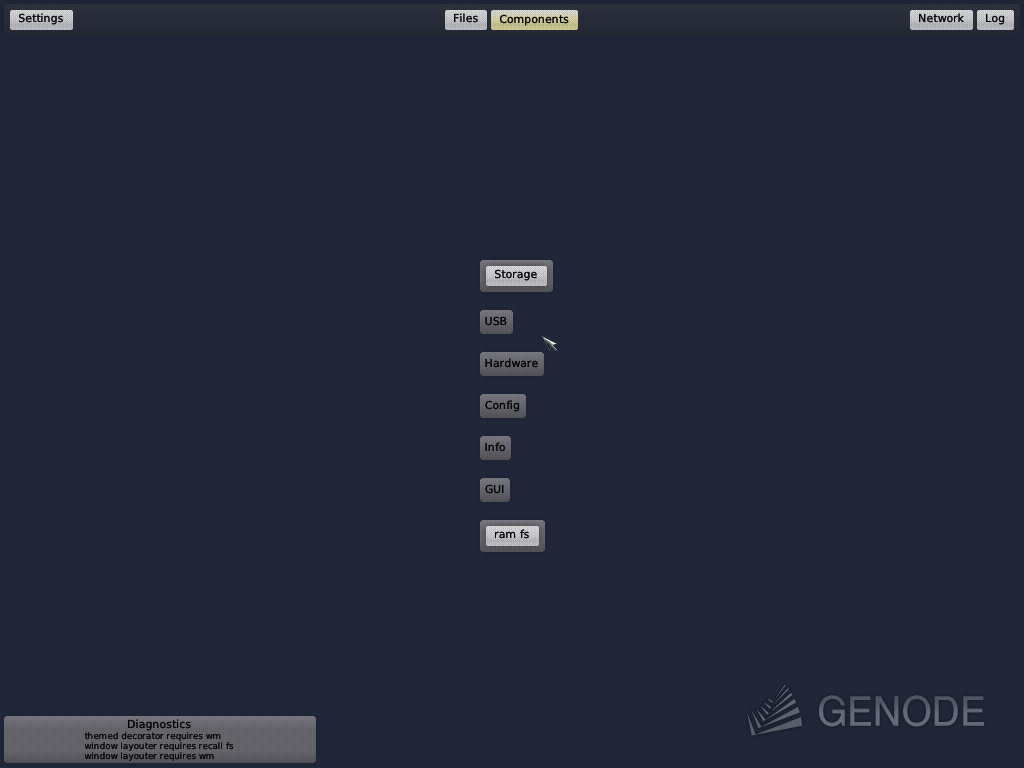
The sculpt_test.run script brings up Sculpt OS in just a few seconds. It integrates the content of the pre-built packages we downloaded before.
|
When running on Linux, the run script assembles the system according to the information given in the repos/gems/sculpt/default-linux.sculpt file. The default-linux.sculpt file describes a fairly bare-bones variant. But it's the real deal! By adding the following line to this file, we instruct the run script to integrate our custom build of the menu-view component instead of the pre-packaged version:
build: app/menu_view
By executing the run script again, our customizations take effect.
|
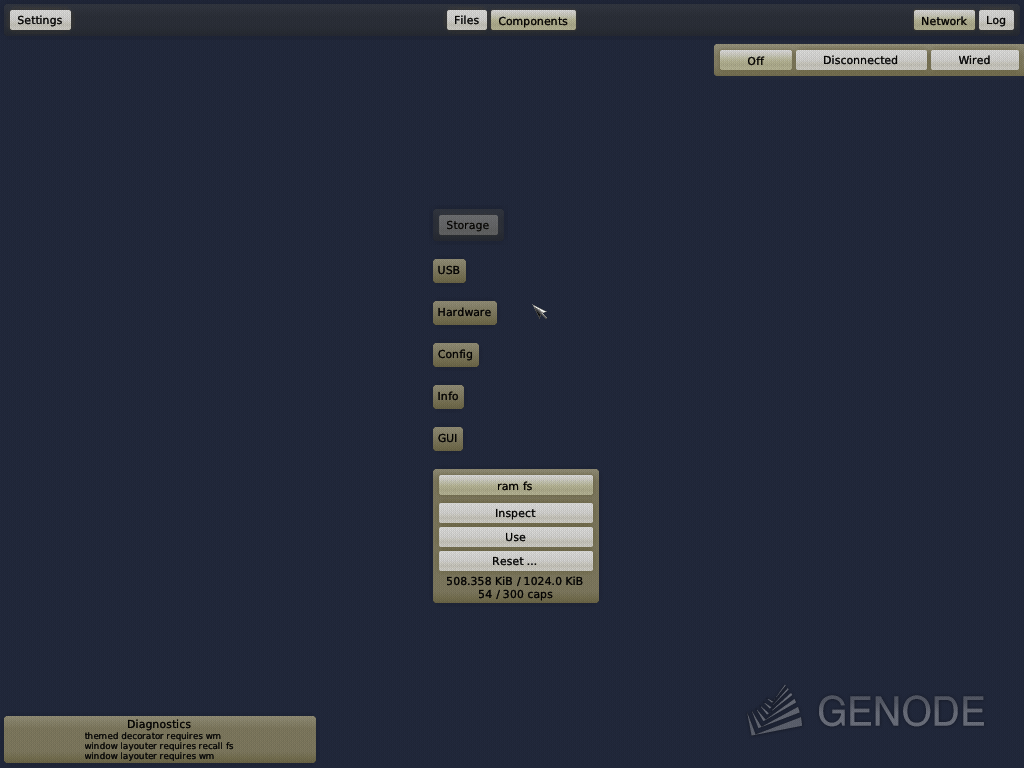
BTW, while playing around, one still can see some geometry animations, namely the movement of windows. You can remove those animations by changing all motion attribute values you find in repos/gems/sculpt/leitzentrale/default to "0".
As another idea, how about changing the orientation of the component graph, just because, why not? This can be accomplished by adding the following line just at the beginning of the Graph::view method in the repos/gems/src/app/sculpt_manager/graph.cc file:
s.attribute("direction", "south");
To let this modification of the sculpt_manager come into effect, we have direct the repos/gems/sculpt/default-linux.sculpt file to our customization by adding the following line (at this point, you certainly start seeing a pattern):
build: app/sculpt_manager
|
A system image for the PC
Now, let's leave Linux land and bring our creation to bare-bones hardware.
-
Download all ingredients needed for a Sculpt boot image for the PC.
genode$ ./tool/depot/download \ genodelabs/bin/x86_64/base-nova/2023-10-25 \ genodelabs/pkg/x86_64/sculpt/2023-10-25 \ genodelabs/pkg/x86_64/drivers_managed-pc/2023-10-25 \ genodelabs/pkg/x86_64/pc_wifi/2023-10-25 \ genodelabs/bin/x86_64/pc_nic_drv/2023-10-25 -
Prepare the GRUB bootloader, which is needed for booting from the disk image.
genode$ ./tool/ports/prepare_port grub2
-
As an optional (but recommended) step, build the system image and start it up in the Qemu emulator.
 genode$ make -C build/x86_64 run/sculpt_test \
                 KERNEL=nova BOARD=pc DEPOT=omit LOG=core
Should you get an error like "-no-kvm: invalid option" with your version of Qemu, comment out the following option in your build/x86_64/etc/build.conf file. You may need to do the same for the "-display sdl" option.
#QEMU_OPT += -no-kvm
After a few seconds, the familiar Sculpt user interface should appear, but without any of our customizations. This is because, we haven't yet told the PC variant of Sculpt to take them into account. We can achieve this by adding the following line to the repos/gems/sculpt/default-pc.sculpt file.
build: app/menu_view app/sculpt_manager
Upon the next try, you should be greeted with your custom color scheme.
-
To build a system image for a bootable USB stick, invoke the sculpt_image.run script as follows.
 genode$ make -C build/x86_64 run/sculpt_image \
              KERNEL=nova BOARD=pc DEPOT=omit \
              RUN_OPT="--include boot_dir/nova --include image/disk"
Upon completion, you will see a message like this:
 Created image file var/run/sculpt_image.img (29904kiB)
 Disk image:     depot/genodelabs/image/sculpt-pc-2023-11-10.img
 Boot directory: depot/genodelabs/image/sculpt-pc-2023-11-10

 Don't forget to extend your depot/genodelabs/image/index file

 <index>
   <image os="sculpt" board="pc" version="2023-11-10">
     <info text="..."/>
   </image>
   ...
 </index>

 Once updated, publish the image index along with the new image as follows:

   ./tool/depot/publish genodelabs/image/sculpt-pc-2023-11-10 genodelabs/image/index
Note that the image has been named after the current date (of this writing). In the instructions below, you'll need to adjust the date to your's.
The first lines of the message directs you to the disk-image file that you can write to a USB boot stick.
 genode$ sudo dd if=build/x86_64/var/run/sculpt_image.img \
                 of=/dev/sdx \
                 bs=1M conv=fsync
Here, /dev/sdx refers to the device node of your USB stick. To determine it, you may inspect the output of dmesg after plugging it in.
-
The second part of the message above - the instructions about the image index and the publishing step - is useful if you want to make your image available to others via Sculpt's built-in update mechanism.
The very last command - publishing the image under the name of genodelabs - however, can only work when in possession of the private PGP key of Genode Labs. This credential is of course closely guarded and not generally available. However, you can publish the exact same image under your name. Let's say, assuming that GPG (GNU privacy guard) knows the private key of your identity "John", we can tell Genode's publish tool about the key to use for signing your image.
genode$ mkdir repos/gems/sculpt/depot/john
This is where the publish tool will look for the pubkey that matches the identity of john in your GPG keyring. Let GPG hand out this public key in ASCII-armored form and write it to John's pubkey file.
Please look up the documentation of GPG's --export option for details.
genode$ gpg --export John > repos/gems/sculpt/depot/john/pubkey
Now copy image data from depot/genodelabs/ to depot/john/.
genode$ mkdir depot/john
genode$ cp -r depot/genodelabs/image depot/john/image
Declare the availability of the image, including a bit of changelog information, in John's image index file depot/john/image/index. Here is how it may look like.
 <index>
   <image os="sculpt" board="pc" version="2023-11-10">
     <info text="larger buttons"/>
     <info text="disabled animations"/>
     <info text="changed graph direction"/>
   </image>
 </index>
Create signed archives for the image and the image index.
 genode$ ./tool/depot/publish john/image/sculpt-pc-2023-11-10 \
                              john/image/index
Once after you entered the PGP passphrase for you private key, the publish tool creates the signed archives.
 publish public/john/image/sculpt-pc-2023-11-10.tar.xz
 publish public/john/image/sculpt-pc-2023-11-10.img.xz
 publish public/john/image/sculpt-pc-2023-11-10.zip
 publish public/john/image/index.xz
Now all you have to do is syncing the content of the public/ directory to a web server. Sculpt users can then obtain your image index - and by extension your image - by interactively adding the URL of your web server as new software provider in the system-update dialog. However, since the official Sculpt image does not know your public key, downloads from your web server can of course not be verified by the official image. But as a user you can still deliberately "Check for unverified Updates", accepting the risk.
By the way, I've just published the customized image as nfeske. If you like to give it a try, install the version 2023-11-10 via Sculpt's system-update dialog.
Two notes for seasoned Sculpt developers:
First, to close that integrity-verification gap mentioned above, you'd need to add John's depot-user information (pubkey and download) to the Sculpt image by adding the following line to repos/gems/sculpt/default-pc.sculpt.
depot: john
To make matters complete, one should also deposit the URL of the corresponding web server in the Sculpt image by adding the file repos/gems/sculpt/depot/john/download. The web server is expected to be a mirror the public/ directory. The download file contains the URL of the root of this directory (without the john/) subdirectory. Sculpt knows where to look because of the name of John's identity is john.
Second, you may intuitively think of changing the --depot-user in your build/x86_64/etc/build.conf file to john in the first place. However, this would require you to build and publish all packages referred to by Sculpt. E.g., the built-in presets would try to download their components from john instead of genodelabs. By keeping genodelabs as depot user, the image uses the same packages as the official Sculpt release. This spares you the trouble of publishing the entirety of Sculpt. And it conserves the disk space and network bandwidth of Sculpt users trying out your image because the genodelabs packages are reused.
Moving on to PinePhone
Let's wrap up our modding streak by bringing our customizations to the PinePhone.
-
Download the ingredients for the Sculpt boot image for the PinePhone:
genode$ ./tool/depot/download \ genodelabs/raw/pinephone-devices/2023-07-13 \ genodelabs/pkg/arm_v8a/sculpt/2023-10-25 \ genodelabs/bin/arm_v8a/base-hw-pinephone/2023-10-24 \ genodelabs/bin/arm_v8a/terminal_crosslink/2023-10-24 \ genodelabs/pkg/arm_v8a/touch_keyboard/2023-10-24 \ genodelabs/pkg/arm_v8a/drivers_interactive-pinephone/2023-10-24 \ genodelabs/bin/arm_v8a/a64_usb_host_drv/2023-10-24 \ genodelabs/bin/arm_v8a/usb_net_drv/2023-10-24 \ genodelabs/bin/arm_v8a/a64_sd_card_drv/2023-10-24 \ genodelabs/pkg/arm_v8a/a64_wifi_drv/2023-10-24 -
Clone the Git repository of Genode's support for the Allwinner A64 SoC and the Genode-world repository:
 genode$ git clone https://github.com/genodelabs/genode-allwinner.git \
                   repos/allwinner
genode$ git clone https://github.com/genodelabs/genode-world.git \ repos/worldSwitch to the respective branches matching Sculpt 23.10:
genode$ ( cd repos/allwinner; git checkout -b sculpt-23.10 sculpt-23.10 )
genode$ ( cd repos/world; git checkout -b sculpt-23.10 sculpt-23.10 )
-
Create and configure a build directory for the 64-bit ARM architecture
genode$ ./tool/create_builddir arm_v8a
Enable all the REPOSITORIES by uncommenting the corresponding lines:
genode$ sed -i "/REPOSITORIES/s/#//g" build/arm_v8a/etc/build.conf
Manually add the following line to your build/arm_v8a/etc/build.conf file:
REPOSITORIES += $(GENODE_DIR)/repos/dde_bsd
While being at it, enable MAKE += -j4 to speed things up.
-
Build the Sculpt image for the PinePhone:
 genode$ make -C build/arm_v8a run/sculpt_image \
              KERNEL=hw BOARD=pinephone SCULPT=phone DEPOT=omit LOG=core \
              RUN_OPT="--include boot_dir/hw --include image/uboot \
                       --image-uboot-gzip-best \
                       --include image/pine_uboot_sdcard"
On the first try, we hit a minor obstacle, which can be surmounted by following the given advice.
 Error: Ports not prepared or outdated:
   pine_uboot

 You can prepare respectively update them as follows:
   ./tool/ports/prepare_port pine_uboot
The next try builds the U-Boot boot loader before creating an SD-card image:
 Created SD-card image file var/run/sculpt_image.img (20382kiB)
 Disk image:     depot/genodelabs/image/sculpt-pinephone-2023-11-10.img
 Boot directory: depot/genodelabs/image/sculpt-pinephone-2023-11-10

 Don't forget to extend your depot/genodelabs/image/index file

 <index>
   <image os="sculpt" board="pinephone" version="2023-11-10">
     <info text="..."/>
   </image>
   ...
 </index>

 Once updated, publish the image index along with the new image as follows:

   ./tool/depot/publish genodelabs/image/sculpt-pinephone-2023-11-10 genodelabs/image/index
When writing the .img image to an SD-card using the dd command, you can boot your fresh baked image directly from SD-card.
To make your image available to others via Sculpt's built-in update mechanism, mirror the steps given above for the PC.
Closing words
I hope this guide wetted your appetite for exploring Sculpt beyond the regular user-facing level. If you are like me, you will find joy in the almost seamless experience of switching between Linux, emulated PC, real PC hardware, and the PinePhone.
The look-and-feel customizations barely scratch the surface. You can in fact modify any component of Sculpt OS with the exact same procedure, by merely adding a build: declaration to the used .sculpt file. You can go down even to the kernel level:
build: lib/ld core
Happy hacking!