


Sneak peek: dynamic CPU frequency steering with Sculpt 23.04
With the Sculpt 23.04 release an proof-of-concept extension is available for managing frequency, power and performance features of your Intel and AMD CPUs on Sculpt.
Intro
Sculpt sets the preferred performance state for Intel CPUs during boot. The feature got introduced with the Genode 20.11 release and adjusted in Genode 22.11 release by the chainloader bender.
On Sculpt you can open the file /boot/grub/grub.cfg to see and adjust the actual boot values, e.g. intel_hwp_off, intel_hwp_performance, intel_hwp_balanced and intel_hwp_power_saving. You may use the GUI editor or an editor in a shell.
 loadfont /boot/font.pf2
 set timeout=0
 terminal_input console
 terminal_output console

 menuentry 'Genode on NOVA' {
  insmod multiboot2
  insmod gzio

  multiboot2 /boot/bender serial intel_hwp_performance

  module2 /boot/hypervisor hypervisor novpid novga serial logmem
  module2 /boot/image.elf.gz image.elf
 }
Unfortunately, changing the mode during runtime, requires a reboot of the system to take effect, which may be inconvenient in some situations.
In principle, the changes can also be applied during runtime, however the feature requires to be executed in kernel mode, since the used MSR instructions are privileged. Inconvenience can be annoying - therefore I worked in my spare-time from time-to-time on extending the NOVA kernel with the specific MSRs and added a proof-of-concept integration with the Genode's core roottask. The feature is now stable enough for wider audience, after several Genode developers tested the feature across several CPU generations and Sculpt releases. Additionally, with this extension the temperature (Intel) and frequency (Intel and AMD) can be monitored, since they require MSR access too.
Option - on-target system update
The easiest way to test drive the extension, is to use the new on-target system update feature of Sculpt 23.04. With that, you can update the used Sculpt image with another image running on Sculpt. The referenced article describe the details, in short: choose "System -> Update", click on the default URL of genodelabs. Choose from the URL list the one with alex-ab as depot. Afterwards click on the "check for update" button, choose the "2023-05-29" image and download and install it. After a re-boot of Sculpt, the feature will be active.
After reboot a new ready-to-use launcher
 +
   -> frequency
is available. When started initially, it will download the required package. The content of the launcher and details are described below.
Option - build the Sculpt image yourself
Alternatively, you have to re-build the sculpt image with the changes by your own. Follow the instruction of the Sculpt release notes - build the Sculpt image and use the commits of my sculpt_23_04_power branch. Copy your new Sculpt image to your preferred boot medium and start.
After boot, you will have to download one of the msr packages.
+
-> Depot
-> alex-ab
-> CPU frequency and temperature (Intel & AMD)
-> msr tool (with GUI)
-> msr tool (no GUI)
The msr package contains just the msr component, which reports changes of temperature, frequency and Intel HWP and AMD pstates as Genode reports. It also can be configured to enforce a new Intel HWP or AMD pstate setting. For details consult the README of the msr component. The msr_gui package contains the msr component and a GUI frontend, which makes the usage more user friendly.
The actual msr component is available via sculpt_23_04_power branch and the GUI frontend is available from my my repository.
After configuration of the msr package, it will fail with a message about insufficient permissions. In order to get it working, you will have to copy the respective start node from the config/managed/deploy and create a launcher with the special "managing_system" permission attached, e.g.:
 <launcher managing_system="yes" pkg="alex-ab/pkg/msr_gui/2023-05-29">
   <route>
     <service name="Gui">
       <child name="wm"/>
     </service>
     <service name="File_system" label="fonts">
       <child name="fonts_fs"/>
     </service>
     <service name="ROM" label="platform_info">
       <parent label="platform_info"/>
     </service>
     <service name="Report">
       <parent/>
     </service>
   </route>
 </launcher>
Usage
With the first successful start, the tool will show all CPUs with their current frequency and temperature:
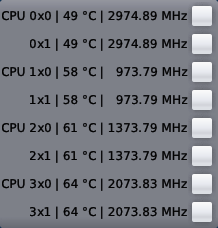
|
By choosing the button left of the CPUs, the settings menu can be opened and closed:
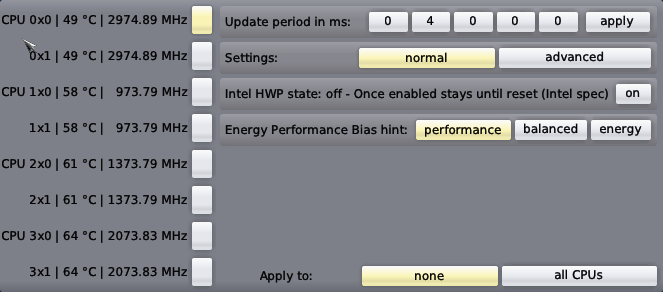
|
In the menu you can change the update frequency of the tool with right/left mouse clicks on the number buttons. If Intel HWP is still off, (if disabled in /boot/grub/grub.cfg), you may enable it once. According to the Intel specification, it can't be disabled afterwards until reset. In the normal settings mode, you can choose between performance, balanced and power-saving mode. Your changes will be effective as soon as you press the apply to all CPUs button at the bottom.
|
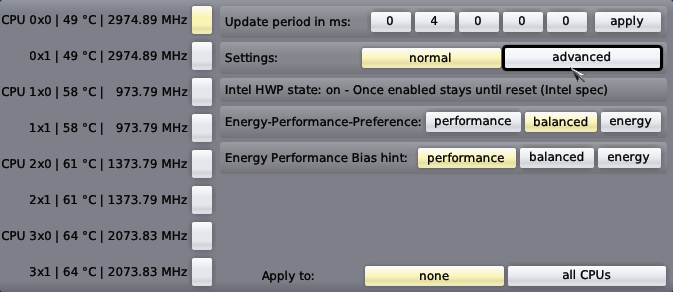
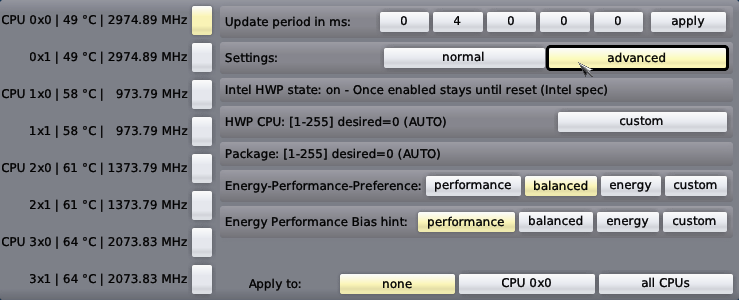
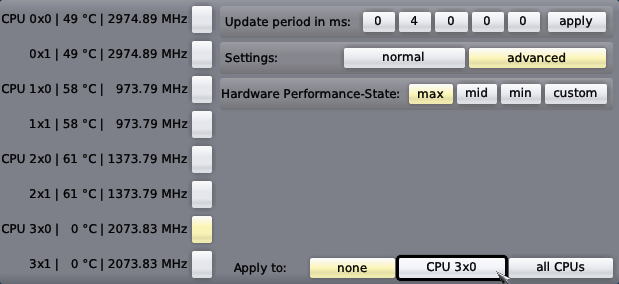
Additionally, you may enable the advanced settings mode, where more details are shown and accessible by toggling the custom buttons. In the advanced mode you may also apply your changes per CPU instead of applying it to all CPUs at once. The advanced mode differs between Intel and AMD, because the MSRs are not standardized (beside the frequency monitoring).
Intel:
|
AMD:
|
When selecting the custom button, you may change even the values in the range as specified by the CPUs. For details, at the moment, one have to read the AMD and Intel specification, which is left to the advanced user as exercise ...
Happy tuning !